Stop Hot Tub Shifts and Cracks: Concrete Base Thickness, Size, and Installation Fixed
If your hot tub rocks when you enter, has cracked pavers around it, or water pools under the equipment bay, your concrete pad is too thin, too small, or was poured without proper leveling and reinforcement. This is a dangerous flaw that can warp the shell, snap plumbing lines, and cause injury-it demands immediate action before you use the tub again.
What You Need:
- 30 minutes for a site inspection
- A tape measure and a 4-foot level
- A notepad to sketch and note dimensions
- This guide for reference
I’ll show you how to build a permanent, code-compliant base that handles the weight, all without a single professional call.
Why Your Hot Tub Absolutely Needs a Solid Foundation
Think of your hot tub’s base as its spine. A weak foundation means a world of expensive, frustrating problems you just don’t need. I’ve seen the aftermath of a sunken corner-twisted frames, snapped plumbing, and a heater that groaned under the strain until it finally quit. That single repair bill was more than the cost of pouring a proper slab in the first place. A solid base isn’t just about keeping the tub level; it’s about preserving every pump, pipe, and circuit board inside it from premature failure. Even if it’s just set on your deck, it needs to be ready to bear the load.
The Real Weight of a Filled Hot Tub
Let’s talk numbers, because most folks are shocked. A medium-sized hot tub holds about 400 gallons of water. Water weighs 8.34 pounds per gallon. Do the math: that’s over 3,300 pounds of water alone. Now add the tub’s dry weight (easily 600-800 lbs) and four adults (another 600-800 lbs). You’re looking at nearly 5,000 pounds concentrated in one spot! That’s the weight of a mid-size SUV sitting in your backyard. An unstable base under this load will compact and shift, leading to a cascade of mechanical issues starting with the shell and framing. Your patio pavers or a bed of sand simply cannot handle this kind of sustained, concentrated pressure.
How Thick Should Your Hot Tub Slab Be?
For a standard residential hot tub, a 4-inch thick reinforced concrete slab is the universal starting point. I always pour mine at a full 4 inches, never less. This isn’t the place to try and save a few bucks on concrete. The real secret isn’t just the thickness, but what’s inside it: a grid of ½-inch rebar or heavy-gauge welded wire mesh placed in the middle of the pour. This reinforcement absorbs tension and prevents the slab from cracking under the immense weight and temperature swings. Knowing the average weight of a full hot tub matters because it directly influences base design and long-term stability. It explains why the slab and reinforcement must account for the full load when the tub is filled. For larger, eight-person spas or if you have any soil concerns, bumping up to a 5 or 6-inch slab is cheap insurance.
Understanding Frost Lines and Soil Stability
This is the part DIYers most often miss, and it’s a silent slab-killer. The frost line is how deep the ground freezes in your area. When water in the soil freezes, it expands and pushes upward-a force called “frost heave.” If your slab isn’t below this line, that heave can lift and crack it like a cookie. You must excavate and prepare a base that extends below your local frost depth; call your county building department for this number. Your slab’s strength comes from its layered base:
- Excavate to a depth below the frost line.
- Add and mechanically compact 4-6 inches of crushed stone or gravel. This is your “base course” for drainage and stability.
- Lay a vapor barrier (6-mil plastic) to prevent moisture from the soil seeping up into the concrete.
- Position your rebar grid on chairs or dobies to keep it centered in the concrete pour.
Neglecting these steps is asking for a tilted, cracked tub. I learned this the hard way on an early job in Michigan-the following spring, the client’s brand-new tub had a two-inch lean from frost heave. We had to break out the entire slab and start over. Proper base preparation is a one-time job that eliminates a decade of headaches.
Getting the Pad Size and Placement Right
Think of your hot tub’s concrete pad as its permanent foundation—get the size wrong, and you’re asking for a world of wobbles and stress cracks. The golden rule is simple: your pad must extend at least 6 to 12 inches beyond the hot tub’s footprint on every single side. For a common 7′ x 7′ tub, aim for an 8′ x 8′ or 9′ x 9′ slab. This overhang isn’t just for looks; it distributes the immense weight (water alone is 8.34 lbs per gallon) and prevents the edges from crumbling under pressure. Always double-check your model’s exact dimensions in the manual, don’t just guess.
Placement is equally critical. You need perfectly level ground, away from tree roots that can heave the slab, and with positive drainage so rainwater flows away from the tub. I learned this the hard way when a client’s “level” yard secretly sloped, leading to constant flooding around the equipment bay. Use a long 4-foot level and a string line to verify your site is flat in all directions before a single shovel hits dirt.
Planning for Service Access and Future Repairs
This is the step most DIYers regret skipping. That pristine, flush installation might look magazine-ready, but it’s a nightmare when the circulation pump hums its last song. You must plan for the day you need to get to the equipment. Leave a minimum of 18 to 24 inches of clear access space on the side where the equipment panel is located; this is non-negotiable for any repair. I’ve spent too many afternoons as a contortionist, trying to reach a leaking union fitting in a dark, cramped space.
Consider the full path: can you easily roll a dolly or carry a new heater cartridge to the spot? Blocking access with a deck railing or a permanent planter might save six inches now, but it will cost you hundreds in extra labor later when a technician has to work around it. Sketch your plan from a repairperson’s perspective, not just an owner’s.
Step-by-Step: Installing Your Concrete Hot Tub Base
Pouring a slab is a solid weekend project if you’re methodical. Rushing leads to cracks, and cracks lead to unstable hot tubs. Gather your tools: a shovel, tamper, 2×4 lumber for forms, a concrete mixer (rental is fine), rebar, and a good float.
Step 1: Site Preparation and Building the Form
Excavate the area to a depth of 6 inches. Remove all organic soil and soft clay until you hit compact, stable subsoil. Fill the hole with 4 inches of compacted gravel-this is your base for drainage and frost heave prevention. The remaining 2 inches is for your concrete.
Build your form with straight 2x4s staked securely into the ground. Your inside dimensions should match your desired pad size. This wooden frame is what gives your slab its shape, so take the time to make it perfectly square and level-I use a laser level for this, but a water level works great too. Check for level diagonally as well as on all sides.
- Compact the gravel base until it’s hard and flat.
- Lay a vapor barrier (6-mil poly sheeting) over the gravel to stop moisture wicking up from the ground.
- Double-check all form measurements; concrete is unforgiving once poured.
Step 2: Reinforcement and Pouring the Concrete Mix
Concrete without reinforcement is brittle. Use welded wire mesh (6×6 inch grid) or #3 rebar tied on 12-inch centers. Lift the reinforcement into the middle of the slab depth as you pour; letting it sit on the bottom does almost nothing.
For the mix, specify a minimum 3000 psi concrete with air entrainment for freeze-thaw durability. When ordering ready-mix, tell them it’s for a hot tub base; they’ll recommend the right blend for your climate and the weight load. Pour the concrete into one corner of the form and work it to the edges with a shovel to avoid voids.
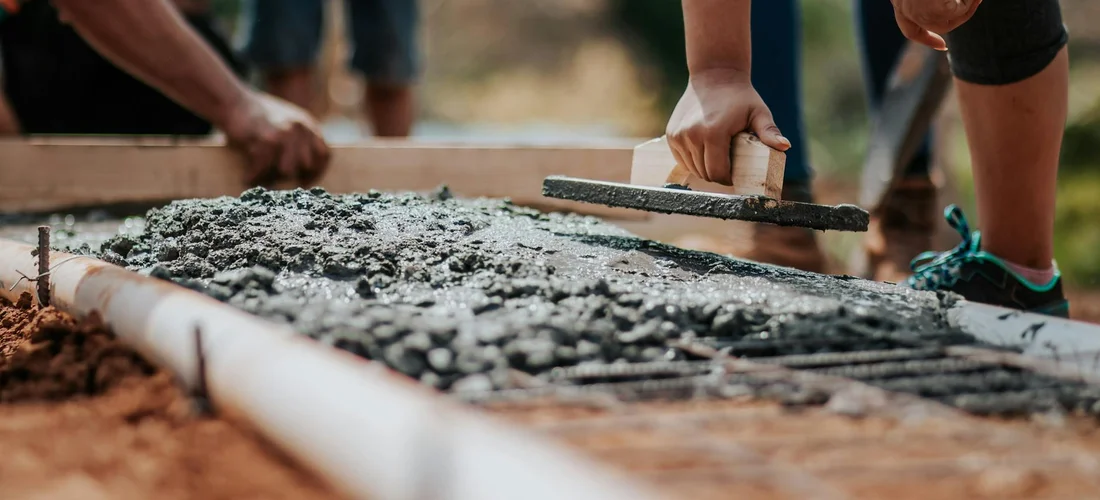
- Use a screed board (a straight 2×4) resting on the forms to level the concrete by moving it in a sawing motion.
- Float the surface with a magnesium float to bring cream up and push aggregate down.
- Create a very slight slope (about 1/4 inch over 4 feet) away from the future hot tub location for water runoff.
Step 3: Curing, Sealing, and Final Prep
Curing isn’t drying; it’s a chemical process where concrete gains strength. If it dries too fast, it becomes weak and dusty. Keep the slab moist by covering it with plastic sheeting or spraying it lightly with water 2-3 times a day for at least 7 days. I’ve seen slabs crack in 48 hours because someone left them exposed to a hot, dry wind.
After a full week, remove the forms. Now, apply a penetrating concrete sealer. This is your shield against spa chemicals, oils, and water stains. A quality acrylic or silane-siloxane sealer soaks in and prevents spalling-that ugly chipping you see on untreated concrete. Let the sealer dry completely per the manufacturer’s instructions.
Your final task is a last level check. Place a long, straight board across the slab and set your level on it. Any significant low spots need to be addressed with a leveling compound before the hot tub delivery crew arrives, or you’ll be shimming forever. The surface should be smooth, solid, and ready for decades of relaxation. Even the best placement won’t help if your base isn’t right.
Concrete Pad vs. Other Hot Tub Base Options
While a poured concrete slab is the gold standard, it’s not your only choice. I’ve installed hot tubs on everything from crushed stone to reinforced decking. The best base for you depends on your budget, landscape, and how permanent you want the installation.
When a Gravel Base Makes Sense
A compacted gravel base is a fantastic, cost-effective alternative I often recommend for ground-level installations. It provides excellent drainage, which is a lifesaver in rainy climates. The key is using the right material: crushed stone or “crusher run” (a mix of stone dust and gravel up to ¾”) locks together when compacted, creating a firm, stable layer that won’t shift like rounded pea gravel.
I use a gravel base when:
- The soil is well-draining and not prone to frost heave.
- The budget is tight, but a solid, level surface is still needed.
- Future relocation of the tub is a possibility.
- You’re comfortable building a solid, contained frame (often using 4×4 or 6×6 timbers) to hold the gravel in place.
Beyond gravel, consider these options:
- Concrete Pavers: A great middle-ground. They sit on a compacted sand-and-gravel base, offer a clean look, and are adjustable. Ensure they are rated for the load (at least 4 inches thick) and laid perfectly level.
- Reinforced Decking: This is a specialty. Your deck must be engineered to handle the immense weight-a filled hot tub can weigh over 5,000 lbs. I always insist on consulting a structural engineer before placing a tub on any elevated deck.
- Precast Spa Pads: These interlocking plastic grids filled with gravel are a solid DIY favorite. They create a permeable, stable base and are easier to level than pouring concrete yourself.
Common Concrete Base Mistakes That Cost Money
I’ve seen more hot tub problems rooted in a bad base than almost anything else. These errors might not show up for a year, but when they do, repairs are invasive and expensive. Getting the base wrong can lead to cracked acrylic shells, plumbing leaks, and a tub that never sits level, causing constant draining and refilling to fix water chemistry. That’s why many guides focus on avoiding the most common hot tub problems. A well-prepared base is the first line of defense.
Mistake 1: The “4-Inch Is Fine” Assumption
A 4-inch thick slab might be quoted for a light garden shed, but it’s gambling with a hot tub. With dynamic loads from people moving, it can flex and crack. For permanent peace of mind, I never pour a residential hot tub pad less than 6 inches thick, and I use 3500-psi concrete reinforced with wire mesh or rebar. The small extra cost upfront saves thousands in tub repairs later.
Mistake 2: Ignoring Drainage and Frost Lines
Concrete doesn’t make water disappear. If you pour your pad in a low spot that collects runoff, you’re building a bathtub for your bathtub. Water will seep underneath, and in freezing climates, this leads to frost heave. Always install your pad so it is slightly elevated from the surrounding grade, with a subtle slope (about 1/4 inch per foot) away from your house for runoff. In northern zones, the base gravel should extend below the local frost line.
Mistake 3: Skipping the Vapor Barrier
This is a simple step with huge consequences. A layer of 6-mil polyethylene plastic between the compacted gravel sub-base and the concrete does two critical jobs. First, it prevents ground moisture from wicking up into the slab, which can accelerate wear. More importantly, it stops the concrete from curing too quickly by locking in its moisture, resulting in a much stronger, less brittle pad that is far more resistant to cracking.
Mistake 4: Forgetting About Future Service Access
Hot tubs have equipment panels that will need service. I once had to help a client cut a hole in their beautiful new wooden deck because the tub was installed too close to a wall. Before the concrete is poured, know the exact dimensions of your tub’s equipment compartment and ensure your pad extends far enough on that side to allow full panel removal-usually at least 24 inches of clear, level space. Plan for a technician’s knees and toolbox.
Common Questions
Is a 4-inch thick concrete slab always enough for my hot tub?
While a 4-inch slab is the standard starting point, it’s not always sufficient. For a standard mid-size tub on stable, well-draining soil, a properly reinforced 4-inch slab is adequate. However, for larger spas, softer soil, or in climates with significant ground freeze, a thicker 5 or 6-inch slab is recommended for long-term stability and to prevent cracking.
How do I know if my soil needs special consideration for the slab thickness?
Your soil type directly impacts the required base preparation. Clay-heavy or poorly draining soils compress more under weight. If your soil doesn’t drain well or is “soft,” you must excavate deeper and use more compacted gravel in the base. In these cases, also increase the concrete slab thickness to 5 or 6 inches to distribute the hot tub’s load over a more stable foundation.
What’s better for reinforcement: rebar or wire mesh?
Both are effective when used correctly. A grid of ½-inch rebar tied on 12-inch centers offers superior tensile strength for high-load areas. Heavy-gauge (6×6 inch) welded wire mesh is also excellent and can be easier for DIY installations. The critical factor is ensuring the reinforcement is lifted to the middle of the slab’s thickness during the pour, so it actively resists cracking.
How long after pouring the concrete can I set up my hot tub?
Concrete reaches most of its strength after 7 days of proper curing, but a full 28-day cure is ideal before subjecting it to the hot tub’s full weight. You must keep the slab moist and covered for at least a week. Never install the tub on a slab less than 7 days old, as premature loading can cause permanent cracks and settlement. This is an important step even before installing the hot tub.
Can I just use a thick gravel base instead of pouring concrete?
A compacted gravel base can be a viable, cost-effective alternative in the right conditions. It is best for well-draining soils and ground-level installations where future relocation is possible. However, a concrete slab provides a more permanent, level, and stable foundation that better resists shifting and frost heave, making it the recommended choice for most permanent installations.
The Final Inspection
Before you even think about filling the tub, give your new concrete base the ultimate test. Place the empty shell on the pad and walk around it, pressing down with your full weight at every corner. Listen for creaks and watch for any rocking or shifting-that silent stability is the sound of a job done right. This last check can save you from a world of plumbing stress and misaligned jets later on.
Your one golden rule for a base that lasts decades is simple: keep water and soil from undermining the edges. Ensure the surrounding ground always slopes away from the concrete, and never let downspouts or lawn sprinklers constantly saturate the earth along the pad’s perimeter. A shifting foundation is the root cause of most shell cracks and plumbing leaks I’m called to fix.
You’ve poured the effort in, now it’s time to pour the water. Your soak awaits on a foundation that won’t quit. Great work.
Further Reading & Sources
- What’s the Best Base for Your Hot Tub? | PDC Spas
- What Base To Put Under A Hot Tub: A Comprehensive Guide | Tubtopia
- r/HomeImprovement on Reddit: Paver base thickness for hot tub
- Picking the Right Hot Tub Foundation – Concrete & Other Options – Bullfrog Spas
- Concrete Pad For Hot Tub – 8 Questions To Ask Your Contractor
- Hot Tub Foundation Guide – 5 Ways To Ensure Spa Stability
Charlie is a hot tub enthusiast with a passion for keeping your jets running smooth and your bubbles bursting with joy. With years of experience in hot tub and jacuzzi maintenance, Charlie knows that a happy tub means a happy you. Whether it’s dealing with stubborn filters or giving your spa a little TLC, Charlie’s here to share expert tips, tricks, and plenty of laughs to help you keep your bubbly retreat in tip-top shape. So, kick back, relax, and let Charlie handle the rest — because no one likes a cranky jacuzzi!
Outdoor Setup