Stop Foundation Failures: Choose Between Concrete, Gravel, or Spa Pads for Your Hot Tub
Published on: February 18, 2026 | Last Updated: February 18, 2026
Written By: Charlie Bubbles
If your hot tub is tilting, you hear the pump straining, or water isn’t circulating evenly, your foundation is failing. This isn’t a simple eyesore; an unlevel base puts immense stress on your spa’s shell and plumbing, leading to leaks, heater damage, and warranty voids that I’ve seen cost owners thousands. From my years as a technician, a proper base is as critical as balanced water chemistry.
- What You Need:
- A sturdy 4-foot level
- Tape measure and site marker
- Honest assessment of your soil and drainage
- Clear budget for materials
- 20 minutes to read this guide and decide
I’ll walk you through each option so you can install a rock-solid foundation yourself, without ever needing to call a pro.
Why Your Hot Tub’s Foundation Matters More Than You Think
You might be tempted to just slide your new spa onto the patio, but that foundation is doing a lot more than just holding it up. It’s the silent partner in every relaxing soak, ensuring everything from the hum of the circulation pump to the clarity of the water stays perfect. A weak base is a slow-motion disaster for your investment.
The Real Cost of a Cut-Corner Base
I learned this lesson early on fixing a customer’s constantly failing jet pump. The tub was on uneven, compacted dirt, and one corner had sunk three inches. That slight tilt forced the pump to work against gravity, leading to a burned-out motor and a costly service call. That off-kilter strain doesn’t just hurt pumps; it twists the entire acrylic shell, leading to hairline cracks that are a nightmare to repair. Manufacturers are sharp-they can often tell if a crack started from an improper base, and that will void your warranty in a heartbeat.
The Crucial Site Assessment: What to Check Before You Build
Don’t just pick a spot that looks flat. A proper site check saves you from future headaches and is the first step in responsible, energy-efficient spa ownership.
Calculating Your Spa’s Load: Weight and Dimensions
You need to know exactly how much weight you’re asking the ground to hold. A fully loaded hot tub is astonishingly heavy. That means checking your deck support for hot tub loads. A weight structural assessment can confirm the deck can safely carry that load.
How to Crunch the Numbers
Follow these steps to find your spa’s total weight:
- Find the Dry Weight: Check your spa’s manual or spec sheet for the “dry weight” or “shipping weight.”
- Calculate Water Weight: Water weighs 8.34 pounds per gallon. Multiply your tub’s total gallon capacity by 8.34. (A common 400-gallon tub holds over 3,300 lbs of water alone!).
- Add People Weight: Estimate 150-200 pounds per potential bather. For a 6-person spa, that’s up to 1,200 lbs.
- Add it All Up: Dry Weight + Water Weight + Bather Weight = Total Load.
Your foundation must support this entire load, spread over the tub’s footprint, which is typically between 40 to 90 square feet. Aim for a base that can handle at least 150 pounds per square foot (psf) to be safe; concrete pads often exceed 3,000 psf. Understanding the required thickness, base size, and installation method will help you plan accurately. Details on hot tub concrete base thickness, size, and installation are covered in the next steps.
Soil and Slope: The Ground Truth
The dirt under your feet isn’t all the same. Clay holds water and shifts, while sandy soil drains fast but can wash away. Loam is your best friend for stability.
Simple Tests for a Solid Start
Good drainage is non-negotiable. Standing water rots wooden frames and breeds bacteria. Here’s a quick way to check your slope:
- Lay a long, straight 2×4 board on the ground where the tub will go.
- Place a carpenter’s level on top of it.
- You want a very slight slope (about 1/4 inch per foot) away from your house for drainage. If it’s level or slopes inward, you need to regrade.
In cold climates, frost heave is your enemy; it can lift one side of your spa several inches, snapping pipes and cracking the shell. A proper base extends below the frost line to prevent this.
Navigating Red Tape: Permits and HOA Rules
Before you lift a shovel, check the rules. Skipping this can mean fines or being forced to move your spa later.
What to Look Up Before You Dig
Local building codes and HOA covenants vary, but here are common triggers:
- Setback Requirements: How far the spa must be from property lines, fences, or structures (often 5-10 feet).
- Electrical Code: Nearly all permanently installed hot tubs require a dedicated GFCI-protected circuit, installed by a licensed electrician to meet National Electric Code (NEC) standards.
- Building Permits: These are often required for any permanent electrical hook-up or for constructing a concrete pad over a certain size, like 120 square feet.
- HOA Approval: Many associations have rules on exterior fixtures, fencing, and even the color of your spa cover.
Calling your local building department is the single most reliable way to avoid permit pitfalls and ensure your installation is safe and legal.
Breaking Down Your Base Material Options: Concrete, Gravel, and Spa Pads
Picking a foundation feels technical, but it’s simply about giving your spa a firm handshake with the earth. I’ve balanced water chemistry on all three, and a shaky base always makes everything else harder. The right foundation stops problems before they start, saving you from leak detective work and pump strain down the road.
Here’s a quick cheat sheet to get your bearings:
- Concrete Pad: The permanent monument. It’s the poured-in-place choice for a “forever home” installation.
- Gravel Base: The permeable problem-solver. Think of it as a forgiving, self-draining bed for your tub.
- Spa Pads: The modular shortcut. These interlocking grids offer a weekend-DIY path to a level surface.
Concrete Pad Foundation: The Permanent, High-Stakes Choice
I remember the hum of the circulator pump on my first tub, a sound that stayed steady thanks to a flawless concrete base. Pouring a slab is a major project, but when done correctly, it becomes the most reliable part of your entire setup.
The Pros: Unmatched Durability and Stability
Concrete doesn’t negotiate with the elements. This rigid stability is a gift to your hot tub’s plumbing, preventing the subtle shifts that lead to fitting leaks and pump cavitation.
- 30+ Year Lifespan: A well-built pad will often outlast multiple hot tubs, making it a one-time investment.
- Permanent Installation: Perfect for a dedicated spot. You’re not moving it, so the foundation shouldn’t either.
- Superior Weight Distribution: It spreads thousands of pounds evenly, eliminating point loads that can stress the shell.
- Clean, Finished Aesthetic: Provides a swept-clean look that keeps debris and insects at bay.
The Cons: Cost, Complexity, and Potential for Cracking
That rock-solid feel comes with real hurdles. I’ve seen frost heave in Michigan crack a pristine slab, leading to a costly tub re-leveling job.
- High Upfront Cost: Professional installation plus materials makes this the most expensive option by far.
- Professional Skill Recommended: Formwork, pouring, and finishing are arts. A DIY mistake is permanent and expensive to fix.
- Long Curing Time: You must wait a minimum of 7 days, and ideally 28, for full strength before loading the tub.
- Inherent Risk of Cracking: Poor soil compaction, lack of reinforcement, or freeze-thaw cycles can all create cracks.
Specs for Success: Thickness, Mix, and Reinforcement
If you decide to proceed, these numbers are your bible. Never pour directly on dirt; a 4-inch compacted gravel sub-base is your mandatory first layer for drainage and stability.
- Thickness: A 4-inch slab is standard, but bump it to 6 inches for large, multi-pump models or soft soils.
- Concrete Mix: Specify a 3000-psi mix with fiber mesh reinforcement for added tensile strength against hairline cracks.
- Reinforcement: Use 6×6-inch welded wire mesh (W1.4xW1.4) laid in the middle of the slab, or #3 rebar on 12-inch centers.
- Critical Slope: Finish the surface with a barely perceptible slope (about 1/4 inch per foot) away from the tub for spillage runoff.
Gravel Base Foundation: The Affordable, Drainage-First Solution
When you need a solid foundation that won’t trap water, a gravel base is a classic choice. I’ve built a few of these for temporary setups and sheds, and the principle is the same for a hot tub: create a stable, self-draining bed.
The Pros: DIY-Friendly, Excellent Drainage, and Low Cost
This is the true budget and drainage champion. If your yard tends to puddle, this method lets water vanish straight down.
- Very Low Material Cost: Your main expense is the crushed stone and fabric. Compared to concrete, the savings are substantial.
- Simple Installation: No mixing, no pouring, no waiting for cure times. It’s essentially advanced shovel work.
- Superior Moisture Control: Water permeates the gravel layer instead of pooling under your tub’s base, which is a lifesaver for wooden frames.
- Easy to Remove or Adjust: Changed your mind about the location next season? Just rake it out and start over. No jackhammer required.
The Cons: Maintenance, Shifting, and Pest Concerns
Gravel is not a “set it and forget it” foundation. It’s a living base that interacts with the ground beneath it.
- Requires Periodic Re-Leveling: Over time, the weight can cause the gravel to settle unevenly, especially if the initial compaction wasn’t perfect. You’ll need to check it with a level yearly.
- Can Wash Out in Heavy Rain: If not contained with proper borders, a torrential downpour can displace the stone, creating low spots.
- May Attract Insects or Weeds: Even with fabric, organic material will eventually settle in the crevices. Ants and weeds can become unwelcome guests without occasional attention.
A neglected gravel base will slowly become an uneven, weedy mess that compromises your tub’s structure and your peace of mind. Proper hot tub ground preparation should include soil testing and compaction to ensure a stable, level base. Skipping these steps can lead to settling and long-term problems with the tub’s integrity.
Building It Right: Compaction, Fabric, and Stone Layers
Skip any of these steps and you’re building on quicksand. The goal is a monolithic, packed base.
- Excavate the Area: Dig down at least 6 inches, extending 12 inches beyond the tub’s footprint on all sides. This extra space is your working margin.
- Lay and Secure the Geotextile Fabric: This barrier stops weeds and prevents the gravel from mixing with the soil below, which would create mud. Overlap seams by a foot.
- Add and Compact Crusher Run: This is the key. Pour a 4-inch layer of “crusher run” or “road base” gravel-a mix of stone sizes and fine dust that locks together when compacted. Use a plate compactor, not just your feet. The hum of the compactor is the sound of a stable future.
- Top with Decorative Stone: Add a final 2-inch layer of a smoother, washed gravel like pea stone or river rock for a clean finish and better drainage right at the surface.
Always use a mechanical plate compactor; hand tamping simply won’t achieve the density needed to support thousands of pounds without shifting.
Spa Pad Foundation: The Quick, Portable Alternative
These interlocking plastic or composite grids are the modern shortcut. Think of them as a giant, heavy-duty puzzle you assemble on the ground.
The Pros: Instant Installation and Portability
For speed and convenience, nothing beats a spa pad system. I’ve used these for trade shows and it’s astonishingly fast.
- No Curing Time: Unbox, snap together, and place your tub. It’s operational in an afternoon.
- Interlocking Panels or Mats: The grid design evenly distributes the tub’s weight and provides a flat, stable surface without the mess of stone or concrete.
- Ideal for Temporary Setups or Rented Homes: When you move, you take your foundation with you. It’s a major advantage for non-permanent installations.
- Provides Some Insulation: The air gap between the pad and the ground offers a minor thermal break, which can slightly reduce the heater’s workload in cold weather.
The Cons: Load Limits and Weather Vulnerability
This is where you must read the fine print. Not all spa pads are created equal for a water-filled 500-gallon tub.
- Check Manufacturer’s Weight Rating Carefully: You must calculate your tub’s wet weight (tub + water + people) and ensure the pad’s PSI rating exceeds it with a safe margin. This is non-negotiable.
- Can Become Brittle from UV Exposure: Cheap plastics will degrade and crack in direct sunlight over a few seasons, losing their structural integrity.
- May Shift on Soft Ground: If placed directly on loose soil or lawn, the entire pad assembly can tilt or sink unevenly under the immense load, just like a stone base would.
Exceeding the load rating is the fastest way to crack a spa shell; the pad will fail, and the unbalanced pressure will transfer right into your tub’s acrylic. Should cracks appear, consider methods and materials for repair cracks in your hot tub for guidance on fixes. These practical steps use common materials and tools.
Choosing the Right Pad: Material Types and Load Ratings
Your choice here dictates longevity. Look for these material specs.
- Reinforced Recycled Plastic (Polypropylene): Common and affordable. Look for UV-stabilized versions. Load ratings vary wildly from 25 to 80+ PSI.
- High-Density Polyethylene (HDPE): More rigid and often has a higher load capacity. Better resistance to cracking in cold temperatures.
- Rigid EVA Foam Mats: These are lighter and offer more cushion/insulation but have much lower load limits. Best for very small, lightweight plug-and-play models only.
For a full-size tub, insist on a pad system rated for a minimum of 75 PSI, and always prepare a level, compacted gravel base beneath the pads for the best possible performance. This is especially important when selecting the right size pad for your hot tub.
Installation Showdown: DIY Steps for Each Foundation Type
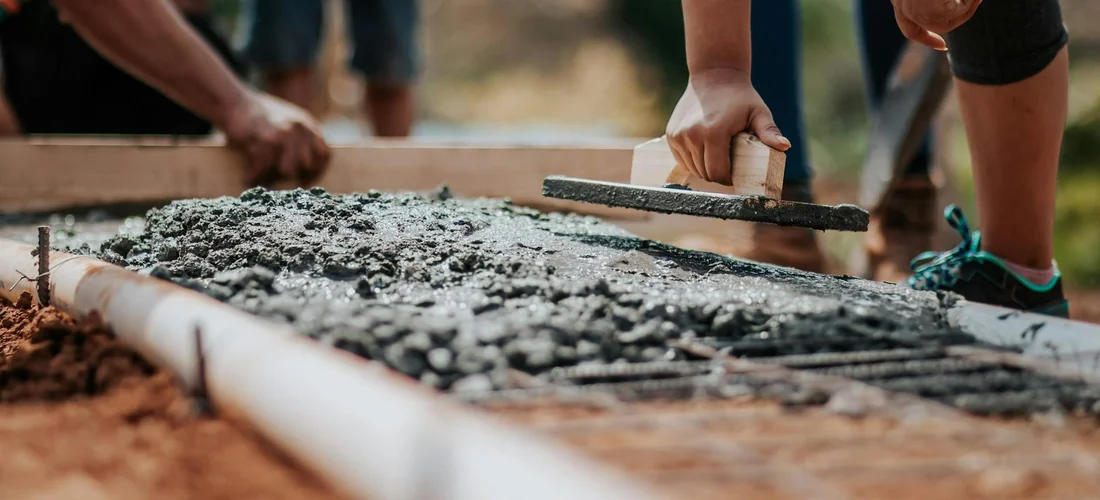
Pouring a Concrete Slab: Key Steps for the Handyman
I’ve helped pour a dozen pads over the years, and the difference between a job done right and a cracked mess always comes down to patience. Think of it like balancing your water-rush the process and you’ll pay for it later.
Follow these phases in order, and give the concrete the time it needs to cure properly for a rock-solid foundation.
- Form the Pad: Use 2×4 lumber to build a frame exactly to your hot tub’s dimensions, adding an extra 6-12 inches on all sides for workspace. Drive stakes to hold it square and level.
- Add Reinforcement: Lay down a grid of rebar or welded wire mesh inside the form, propping it up on small stones so it suspends in the middle of the slab. This gives the concrete tensile strength.
- Pour and Finish: Mix a 4000-psi concrete blend and fill the form. Use a screed board to level it, then a float for a smooth surface. I always edge the perimeter with a trowel to prevent chipping.
- The Critical Cure: This is non-negotiable. Keep the slab moist by covering it with plastic sheeting or spraying it lightly for at least 7 days. I learned the hard way that pouring a slab in hot, dry weather and ignoring the cure leads to shrinkage cracks you can feel underfoot.
Building a Gravel Base: From Digging to Final Leveling
A well-built gravel base is a beautiful thing-it breathes, drains, and adjusts. I’ve fixed hot tubs sitting on soggy ground by reinstalling them on a proper gravel foundation. Sometimes, a gravel base isn’t the right choice.
The secret is in the compaction; a loose gravel bed will shift and leave your tub feeling unsteady.
- Mark the Area: Outline a space at least 6 inches wider than your tub on all sides using stakes and string.
- Excavate: Dig down 6 to 8 inches deep across the entire area. Remove all grass, roots, and organic material.
- Install Landscape Fabric: Line the hole with a heavy-duty woven geotextile fabric. This prevents weeds and stops the gravel from mixing with the soil below.
- Add and Compact Gravel Layers: Pour in a 4-inch layer of 3/4-inch crushed stone. Spray it with a garden hose until damp, then use a plate compactor to crush it firm. Repeat with a second 2-inch layer of finer, 1/4-inch minus gravel.
- Final Leveling: Drag a long, straight 2×4 across the surface. Check for level in all directions. The hum of the compactor and the sight of that perfectly flat, gray surface is a handyman’s victory.
Laying a Spa Pad: The One-Day Project
For a fast fix, these interlocking plastic grids are a gift. They’re like the chemical feeder of foundations-set it and mostly forget it. But the prep work is everything.
If your ground isn’t level to start, the spa pad will telegraph every lump and dip, making your tub sit crooked. Even if you try to level a hot tub on sloped ground, it can still pose problems.
- Clear and Level the Ground: Remove all debris and vegetation. Use a shovel and a level to create a flat, firm subgrade. I sometimes spread a thin layer of sand to fine-tune this surface.
- Snap Together Panels: Assemble the interlocking panels on the leveled ground according to the manufacturer’s layout. It should feel like a giant, sturdy puzzle.
- Secure the Perimeter: Many kits include stakes or edging to lock the pad in place. Drive these in to prevent any lateral movement over time. From personal experience, skipping this step on a slight slope led to a slow drift that stressed the plumbing.
Making Your Final Decision: A Side-by-Side Comparison
Let’s put it all on the table. Your choice here locks in years of easy maintenance or frequent headaches. Match this table to your site assessment-your soil type, budget, and how handy you feel.
| Factor | Concrete Pad | Gravel Base | Spa Pad |
|---|---|---|---|
| Cost | Highest. Materials (concrete, rebar, forms) add up. Professional pouring increases cost significantly. | Low to Moderate. Bulk gravel and fabric are affordable. Renting a compactor is the main extra. | Moderate. The kit itself is a one-time purchase, often cheaper than concrete but more than gravel. |
| Durability | Excellent. A properly cured slab lasts decades and won’t shift. It’s permanent. | Very Good. Resists frost heave and settles evenly if compacted well. May require occasional regrading. | Good. UV-stabilized plastic holds up for years, but can become brittle in extreme, constant sun. |
| Installation Difficulty | High. Labor-intensive, precise, and time-sensitive. Requires multiple days for curing. | Moderate. Physically demanding digging and compacting, but the steps are straightforward. | Low. The simplest DIY option if the ground is pre-leveled. Can be done in an afternoon. |
| Drainage Performance | Poor. Water pools on top unless a slope is intentionally formed during the pour. | Excellent. Water permeates quickly through the gravel layers, away from the tub’s base. | Very Good. The grid design allows water to flow through, but requires a free-draining subgrade. |
| Best Climate | Stable, dry regions. Can crack in areas with severe freeze-thaw cycles if not built thick enough. | Almost all, especially wet or cold climates. Superior for frost drainage and preventing heaving. | Mild to moderate climates. Ideal for temporary placements or decks where weight is a concern. |
Your soil’s drainage and your local freeze-thaw cycle should be the loudest voices in this decision-ignoring them is like ignoring high calcium hardness, a problem that only grows.
Quick Answers
How important is my climate when choosing a foundation?
Extremely important. Your local weather dictates the best material for long-term stability. In regions with severe freeze-thaw cycles, a gravel base is often superior as it allows water to drain away, preventing frost heave that can crack rigid concrete. For stable, dry climates, a concrete pad offers unmatched permanence, while spa pads perform well in mild conditions but can degrade under intense, constant UV exposure.
How do I choose a foundation based on my budget?
Your budget directly filters your options. A gravel base is the most affordable, requiring only bulk materials and rental equipment. Spa pad kits represent a moderate, fixed-cost investment. A concrete pad is the most expensive due to material and potential professional labor costs. Remember to factor in long-term value; the higher upfront cost of concrete may offset future maintenance or replacement of a temporary base.
How does ease of installation differ between the options?
Installation difficulty varies greatly. Spa pads are the easiest for DIY, often a one-day project requiring only a level subgrade. Building a gravel base is moderately difficult, demanding significant physical labor for excavation and proper compaction. Pouring a concrete pad is the most complex, requiring skilled formwork, pouring, finishing, and a mandatory multi-day curing period, making professional help highly recommended.
Why must I check local codes or HOA rules before starting?
Ignoring regulations can lead to expensive fines or being forced to dismantle your installation. Local building codes may mandate permits for electrical work or permanent foundations, along with specific setback distances from property lines. HOAs often have rules governing the appearance, location, and even fencing around spas. A quick call to your local building department and HOA can prevent major headaches later.
Should aesthetic preferences influence my foundation choice?
Yes, but only after ensuring structural needs are met. A concrete pad offers a clean, finished, and permanent look. A gravel base provides a more naturalistic appearance but can scatter stone and require edging. Spa pads are functional but may not blend seamlessly into a landscaped patio. Choose the material that meets your stability and drainage requirements first, then consider finishing options like staining concrete or selecting decorative gravel.
The 7-Day Check
Before you celebrate with a soak, give your new setup a final inspection. Run the jets on high for a few minutes and walk a full circle around the tub. Listen for any new vibrations or groans from the pump that might signal an unlevel spot. Look under the skirt for any gaps or bulges in the foundation material. That mirrors the typical inspection process for a new hot tub, ensuring the unit is level and secure before use. It’s a practical step in the standard setup routine that helps catch issues early. This five-minute walk-around can reveal minor settling issues before they become major headaches, saving you from draining the tub later for corrections.
Your foundation’s worst enemy isn’t weight or weather-it’s complacency. A perfectly level pad can shift over seasons, especially with freeze-thaw cycles or heavy rains. Make it a habit to check your tub’s level with a simple carpenter’s level in two directions every time you clean your filters; this one-minute ritual is the ultimate defense against cracked plumbing and premature equipment failure.
The hard part is done. You’ve chosen a solid base, put in the work, and set the stage for years of relaxation. Now, go enjoy that well-earned soak. You’ve built the foundation for it.
Further Reading & Sources
- Best Hot Tub Foundations – 6 Top Options For Your Spa
- The Best Hot Tub Foundation – 6 Ways to Support Your Spa – Koval Building Supply
- 3 FOUNDATION TYPES FOR HOT TUBS | Jacuzzi®
- Choosing the Right Foundation for Your Hot Tub | Sundance® Spas
- 4 Best Hot Tub Foundation Ideas | Colorado Custom Spas
- What’s the Best Base for Your Hot Tub? | PDC Spas
Charlie is a hot tub enthusiast with a passion for keeping your jets running smooth and your bubbles bursting with joy. With years of experience in hot tub and jacuzzi maintenance, Charlie knows that a happy tub means a happy you. Whether it’s dealing with stubborn filters or giving your spa a little TLC, Charlie’s here to share expert tips, tricks, and plenty of laughs to help you keep your bubbly retreat in tip-top shape. So, kick back, relax, and let Charlie handle the rest — because no one likes a cranky jacuzzi!
Outdoor Setup