In-Ground Hot Tub Installation: Your Complete Guide to Burying a Jacuzzi Without Burying Your Budget
Symptom Check: Is your backyard vision of a seamless, elegant in-ground spa being overwhelmed by confusing concrete quotes, plumbing diagrams, and electrical code headaches? You’re not staring at a broken jet-you’re facing a broken plan. The diagnosis is an incomplete installation strategy, and while not immediately dangerous to your tub, it’s a massive threat to your wallet and timeline if you proceed unprepared.
What You Need:
- A Clear Weekend for Planning
- Your Local Building Code Website
- A Tape Measure and Stakes
- A Trusted Helper (or Two)
This guide will hand you the exact blueprint to navigate from a hole in the ground to a perfectly balanced, bubbling oasis, entirely on your own terms.
Why Go In-Ground? Weighing the Commitment
Before you grab a shovel, it’s smart to weigh the dream against the daily reality. An in-ground spa is a different beast than its above-ground cousin, which you can simply unplug and walk away from.
Pros: The Seamless Look and Feel
The biggest draw is undeniable: it becomes a permanent part of your landscape. The integrated look elevates your entire backyard, turning a functional tub into a luxurious, built-in feature that feels more like a natural spring than an appliance.
- Aesthetic Integration: It blends seamlessly with patios, decks, and gardens. No bulky cabinet sides or visible plumbing to break the visual flow of your outdoor space.
- Easier, Safer Entry and Exit: Stepping in is more like walking into a pool. This is a game-changer for anyone with mobility concerns, kids, or for those nights when you just don’t want to climb over a high wall.
- Enhanced Stability and Insulation: Being surrounded by earth provides natural thermal mass, which can help with temperature retention. The structure itself is incredibly solid, free from the flex you sometimes feel in a portable model.
Cons: The Permanent Reality
This isn’t a weekend project you can change your mind on later. An in-ground installation is a major construction commitment, and every future repair must be planned with its buried nature in mind.
- Major Excavation & Upfront Cost: You’re not just buying a tub; you’re funding digging, concrete work, and potential landscaping. The initial investment is significantly higher.
- Complex, Costly Repairs: If a pump fails or a pipe leaks, your technician might need to excavate to reach it. I once spent half a day on a job just digging a careful trench to access a circulation pump on a buried system-the labor cost alone made the owner wince.
- No Moving It: Your design and placement choices are final. If you decide to remodel your yard or sell your house, the tub stays put.
- Drainage is Critical: A poorly planned in-ground tub can become a concrete-lined pond when it rains. The excavation and foundation must include a dedicated drainage plan.
Step 1: The Blueprint – Design, Permits, and Site Prep
This stage is where good dreams avoid becoming nightmare projects. Rushing here guarantees headaches, extra costs, and potential safety hazards down the line.
Navigating Permits and Local Building Codes
Your local building department isn’t trying to slow you down; their codes exist to prevent electrocution, structural failure, and plumbing disasters. Skipping permits might seem faster, but it can void your tub’s warranty, lead to massive fines, and create serious dangers for your family. Even if you think you’re experienced with installations, it’s crucial to follow local regulations.
- Electrical Codes are Paramount: A dedicated, GFCI-protected circuit is non-negotiable. The code will specify wire gauge, conduit type, and required disconnect distances. This is not DIY territory unless you are a licensed electrician.
- Plumbing and Setback Distances: Codes dictate how far the tub must be from property lines, septic systems, and underground utilities. There are often rules about fencing or lockable covers for safety.
- Structural Engineering: For any tub built into a deck or retaining wall, a stamped engineer’s drawing may be required to prove the structure can handle the weight (water is heavy-about 8.3 lbs per gallon).
Choosing Your Spot and Excavation Plan
Picking the right location is about more than just the view. You must balance convenience with practical access for both construction crews and, someday, a repair technician with tools.
- Call 811 Before You Dig: This free service marks public underground utility lines. Hitting a gas line or fiber optic cable is a catastrophic, expensive mistake.
- Plan for Water and Drainage: Place the tub within reach of a garden hose for filling, but ensure the excavated site slopes away from the foundation. Consider where you’ll drain 400+ gallons of water for seasonal cleaning.
- Sun, Wind, and Privacy: A sunny spot helps with natural heating and enjoyment. Windbreaks can make soaks more comfortable. Think about sightlines from neighbors’ windows.
- Machine Access: A small excavator or backhoe will likely be needed. Ensure there’s a clear path that won’t destroy your existing lawn or fencing.
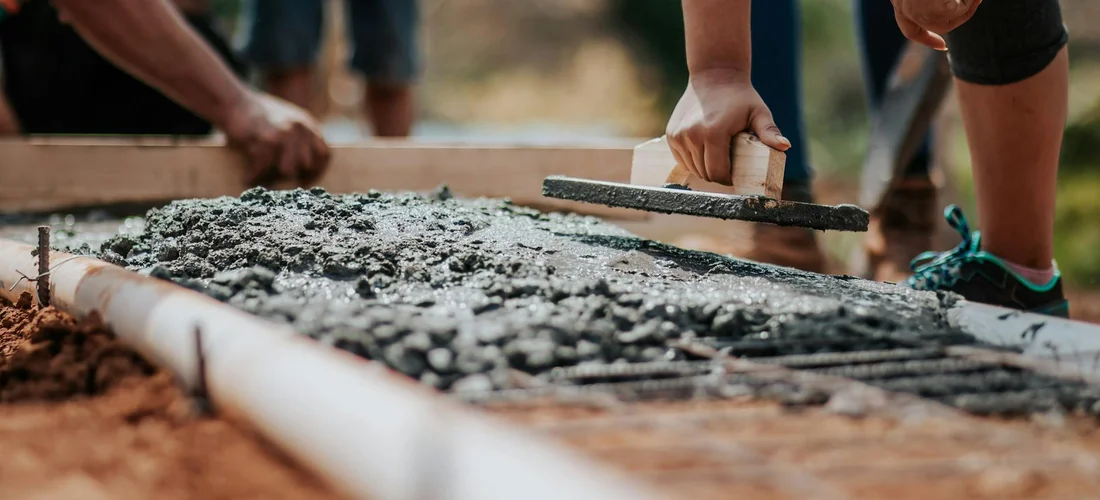
Building a Solid Foundation: Concrete Pad and Structural Support
This is the single most important part of the entire build. A shifting foundation will crack plumbing, strain the shell, and lead to constant leaks. Your hot tub’s concrete pad must be perfectly level, adequately thick, and properly reinforced-there are no shortcuts here. In the next steps, we’ll delve into the concrete base requirements—thickness, size, and installation to help you get this right.
- Thickness and Reinforcement: A minimum 4-inch thick pad is standard, but 6 inches is better for larger tubs. Steel rebar (usually #3 or #4) set in a grid pattern within the concrete is essential to prevent cracking from settling or freeze-thaw cycles.
- Level is the Law: Use laser levels during the pour. Even a slight slope will cause uneven water weight distribution. For precise leveling on top of the cured pad, self-leveling mortar is a pro’s secret for creating a glass-smooth finish.
- Footings for Support: The pad must be poured over well-compacted soil. In softer soils, deeper footings around the perimeter may be required to bear the immense weight, which can exceed 5,000 lbs when the tub is full and occupied.
Step 2: The Nuts and Bolts – Plumbing, Electrical, and Setting the Shell

Running the Circulation and Jet Plumbing
Picture the plumbing as the hot tub’s circulatory system-it needs to be robust and leak-free to handle years of pounding jets. From my time in the field, I always start by dry-fitting all the PVC pipes between the pump, heater, and jet inlets. Dry-fitting lets you catch measurement mistakes before the glue sets, saving you from a costly redo. A hot tub plumbing requirements installation guide provides a broader checklist of tolerances and code considerations. It’s a handy reference as you finalize the piping layout. Use schedule 40 PVC for its pressure rating; it’s the standard for a reason.
When you’re ready to cement, don’t skimp on the primer and glue. For pressurized lines, I swear by a clear PVC primer followed by a medium-bodied cement like Christy’s Red Hot Blue Glue. The blue color confirms full coverage, and that medium body won’t run out of the joint on vertical pipes. Apply primer to both the pipe and fitting socket, then the glue, and twist the pipe a quarter turn as you push it home-that hum you hear later will be smooth water flow, not air bubbles in the lines.
Layout is key. Keep runs as straight and short as possible to reduce pump strain and heat loss. Every sharp elbow adds resistance, making your pump work harder and chewing into energy efficiency. Use 45-degree angles instead of 90s where you can, and always install union fittings before the pump and heater for easy future service.
Electrical Hookup: Safety First, Last, and Always
This is the one step where “DIY” stops, and “call a pro” begins. You’ll need to trench from your main panel to the tub location, laying waterproof PVC conduit at least 18 inches deep. Hiring a licensed electrician isn’t just about code compliance; it’s a non-negotiable safety investment for your family. They’ll handle the permit and ensure everything is up to snuff.
The star of the show is the GFCI (Ground Fault Circuit Interrupter) breaker. This device monitors current flow and can shut off power in a fraction of a second if it senses a fault. That quick click could be the difference between a relaxing soak and a life-threatening situation. Your electrician will install a dedicated 240-volt circuit with this breaker-never try to power a hot tub from a standard outdoor outlet. Many readers also wonder whether hot tubs need a GFCI breaker and why that matters for safety. GFCI breaker safety explained covers exactly that, with clear guidelines for compliant installation.
Once the conduit is run, the electrician will pull THHN/THWN wire, typically 6-gauge for a 50-amp service, and make the connections at the tub’s control box. After they’re done, insist on seeing the GFCI test button work before they pack up. In the next steps, you’ll learn how to test your hot tub’s GFCI breaker to ensure it’s working. The peace of mind is worth every penny.
Placing and Sealing the Hot Tub Shell
With the plumbing stubs and electrical conduit waiting in the hole, it’s time for the big moment-setting the shell. Use a boom truck or several strong friends with lifting straps. Lower the shell slowly, guiding it directly onto the pre-positioned plumbing connections. A cracked shell from a drop is a heartbreak you can avoid with patience.
Once it’s seated, immediately connect the plumbing from the shell to your underground lines. Hand-tighten the threaded unions first, then give them a final snug turn with a strap wrench-over-tightening can crack the plastic. I’ve learned to do this before any backfill to ensure perfect alignment.
Sealing is critical. Apply a generous bead of polyurethane sealant (like Sikaflex-29FL) around all pipe penetrations and between the shell rim and the concrete collar. This flexible waterproofing membrane bridges gaps and moves with temperature changes, stopping leaks before they start. Let it cure fully before even thinking about water.
Step 3: The Finishing Touches – Backfill, Framing, and Decking
Securing the Shell and Managing Water Flow
Backfill isn’t just dirt-it’s structural support. I always use pea gravel. Pea gravel compacts uniformly and provides excellent drainage, preventing water from pooling and freezing against the shell. Avoid sand or soil, which can hold moisture and shift, stressing the fiberglass.
Add the gravel in 6-inch layers, tamping each down gently with a hand tamper. The goal is firm support without using force that could deform the shell walls. As you backfill, keep the area around the equipment bay clear and frame out a future access panel with treated lumber.
Plan for water management. Slope the final grade away from the tub, and consider installing a French drain or channel drain nearby. Directing splash-out and rain away from the foundation prevents erosion and keeps your equipment dry. That access panel you framed will thank you when you need to reach a valve in five years.
Building the Surround and Final Aesthetics
The framing defines your tub’s look and longevity. For permanent installations, I’ve used concrete block (CMU) walls, which are fireproof and rot-proof. Concrete block framing is a rock-solid choice if you’re integrating the tub into a masonry patio. For a warmer look, pressure-treated wood framing is classic, but it must be meticulously sealed.
Your finish material ties everything together. Natural stone veneer offers timeless texture but requires a skilled hand to install. Composite decking boards are my go-to for a low-maintenance surround-they resist splinters, mold, and fading without annual staining. Whatever you choose, ensure it has a slight slope for water runoff.
Leave a consistent gap, about 1/4 inch, between the finishing material and the hot tub’s acrylic lip. This expansion gap accommodates shell movement with temperature changes and prevents unsightly cracking or buckling. Finally, add LED step lights or planters; these personal touches make the space yours, ready for that first steamy, bubbling soak.
Powering Your Paradise: Heater, Pump, and Circulation System Basics
Understanding Your Equipment Package
Think of your hot tub’s equipment pack as its heart and lungs, working together to keep the water inviting. From my years wrestling with pumps in tight spaces, I can tell you that a solid installation here prevents ninety percent of future headaches. You have three key players: the circulation pump, the jet pump, and the heater. These components are crucial to understanding how your hot tub operates.
The circulation pump is the silent workhorse. It runs for hours each day, moving water through the filter and heater to keep it clean and warm. A weak flow here means dirty water and a cold tub. Install it with smooth, sweeping pipe bends to avoid flow-restricting kinks that strain the motor.
The jet pump is all about power. When you hit those massage buttons, this pump kicks in, pushing water through the jets. I’ve replaced ones that were installed with undersized plumbing-they sound like a coffee grinder and die young. Always match the pump’s intake and output to the correct pipe diameter for strong, quiet performance.
The heater is your comfort engine. It warms the water as it passes through from the circulation pump. Good installation means placing it where air can flow freely around it, preventing overheating. Scorched heater elements are often a sign of poor water flow from a failing pump or clogged filter, not the heater itself.
Future-Proofing for Repairs
No one plans for a pump failure, but trust me, it happens. Burying your tub shouldn’t mean burying your access to the machinery. I learned this the hard way after crawling through a muddy pit to fix a leak.
Design your installation with generous, waterproof access panels on at least two sides of the equipment bay. Use marine-grade polymer or composite materials that won’t rot. Your future self will thank you when that pump hum turns to a grind. Make sure the opening is big enough to pull a pump out with your hands, not a crowbar.
Run all plumbing unions and valves so they face the access panel. Label every pipe with a permanent marker-“Suction to Jet Pump,” “Return from Heater.” Twenty minutes of labeling during installation can save you hours of confused troubleshooting down the line.
Caring for Your Buried Treasure: In-Ground Specific Maintenance
Water Chemistry: It’s All About Balance
An in-ground tub lives in a sealed, sheltered environment. This means less water evaporation than an above-ground model, but chemicals can concentrate faster. You need to be precise. I test water every other day in my own tub.
Here are your target zones, measured in parts per million (ppm):
| Parameter | Ideal Range | Why It Matters |
|---|---|---|
| Total Alkalinity | 80-120 ppm | Your pH’s anchor. Prevents the sting of acidic water and protects equipment. |
| pH | 7.2 – 7.6 | Aim for the sweet spot. Too high, and your sanitizer sleeps on the job. Too low, and it eats your pipes. |
| Chlorine (Sanitizer) | 3-5 ppm | Your bacterial bodyguard. In a sealed shell, it gets used up slowly but must stay vigilant. |
| Bromine (Sanitizer) | 4-6 ppm | A gentler, more stable option for consistently warm, in-ground water. |
Adjust alkalinity first, then pH, and always add sanitizer last for the most effective and predictable results. An in-ground tub’s stability is a gift, but it demands regular, disciplined testing.
Seasonal Considerations for a Fixed Installation
You can’t move this tub when the weather turns, so your maintenance calendar must adapt. Here’s my seasonal checklist from fixing tubs in all climates.
For Cold Weather:
- Engage your tub’s freeze protection mode if it has one. This cycles the circulation pump when temps drop near freezing.
- Insulate any exposed plumbing above the ground line with foam pipe sleeves. A frozen pipe crack is a brutal, wet repair.
- Keep the cover sealed tight. Snow load is fine, but brush off heavy amounts to preserve the cover’s core.
For Summer Heat:
- Sun is your cover’s enemy. Use a UV protectant spray every season to prevent the vinyl from becoming brittle and cracking.
- Water chemistry shifts faster with more use and heat. Test sanitizer levels more frequently-sometimes daily during peak season.
- Consider a slightly lower thermostat setting. The earth’s natural coolness can help, but don’t let the tub become a bacteria bath.
The In-Ground Advantage for Energy Efficiency
Burying your tub taps into the earth’s natural insulation. I’ve measured the difference: a well-installed in-ground tub can use 10-15% less energy to heat than a comparable above-ground model sitting on a cold patio.
This benefit isn’t automatic. That inherent efficiency is completely wasted if you have a warped, ill-fitting cover that lets heat escape like an open window. Invest in a high-density, full-foam cover with a tight seal.
Pair that cover with a well-maintained system. A filter cleaned monthly, pumps free of debris, and heaters de-scaled annually ensure the equipment doesn’t labor and burn extra watts. Efficiency is a chain: the earth helps, but your vigilance keeps it linked.
Before You Fill: The Final Inspection and First Soak
That moment before you turn on the water is your last, best chance to catch a simple problem before it becomes a nightmare. I treat this like a pilot’s pre-flight checklist. Skipping a step here can mean draining everything later to fix one loose fitting.
Pressure Testing and Leak Checks
Your plumbing has been buried or encased, so this test is non-negotiable. You’re listening for the silence of a sealed system. Plug all jets and the suction fittings with test plugs or expansion plugs from your hardware store.
- Connect a garden hose to the plumbing via a threaded adapter and slowly pressurize the lines to about 15-20 PSI. A tire pressure gauge on a spare valve works for checking.
- Watch that pressure gauge for a full 30 minutes. Any drop, even a small one, means you have a leak that must be addressed before backfilling or finishing.
- Visually inspect every union, elbow, and valve you can still access. Look for hairline cracks in PVC or tell-tale drips at pump seals and heater connections.
- Remove the pump coupling cover and feel around the shaft seal for moisture. A dry seal now is a good sign; a damp one foretells a pump replacement in your future.
- With the system pressurized, walk the area and listen closely. A faint hiss is your enemy, leading you right to the problem spot.
Initial Chemical Startup and Balancing Act
Filling the tub isn’t just about hose water. What’s in your water dictates your first chemical steps. Ignore this, and you might stain your new shell or fight cloudy water from day one.
First, always use a garden hose pre-filter. It’s a cheap sleeve that screws onto your hose and catches rust, sediment, and other nasties from your pipes. It keeps your fresh water looking pristine from the start.
As the tub fills, pour in a quality metal sequestrant. This chemical grabs onto dissolved iron, copper, and manganese, holding them in solution so they can’t stain your shell or turn your water brown. If you have well water or see any discoloration from your taps, this step is mandatory, not optional.
Once full and circulating, follow this startup sequence:
- Balance Alkalinity (80-120 ppm): This is your chemical foundation. Use alkalinity increaser (sodium bicarbonate) to raise it. Low alkalinity makes pH impossible to control.
- Adjust pH (7.2-7.8): Now tweak the pH. Use pH Up (sodium carbonate) or pH Down (sodium bisulfate) to hit the sweet spot. I aim for 7.4-it’s comfortable for skin and perfect for sanitizer efficiency.
- Add Calcium Hardness (150-250 ppm): Soft water wants to leach calcium from your plaster or equipment. Use calcium hardness increaser to protect your investment. Too high, and you invite scale.
- Shock with a Chlorine or Non-Chlorine Shock: This oxidizes organics from the fill water and preps the water for sanitizer.
- Establish Your Sanitizer: Add your primary sanitizer-chlorine or bromine-to reach the recommended initial dose on the product label. This establishes the reserve you’ll maintain.
Let the pumps run for a full 24 hours on this initial cycle, and resist the urge to get in for that first soak. Your chemicals need this time to properly mix, balance, and create a safe, stable environment. That patience pays off with weeks of clear, comfortable water afterward.
Common Questions
What is the average cost to install an in-ground hot tub?
The total cost is highly variable, but you can expect a range of $8,000 to $25,000+. This wide range accounts for the tub itself, major excavation, concrete work, plumbing, electrical (requiring a licensed electrician), and finishing materials like decking or stone. Reddit forums and owner discussions often cite this broad spectrum, emphasizing that a significant portion of the budget is for site work and labor, not just the hot tub shell. For a more precise breakdown, our 2024 pricing guide on professional hot tub installation breaks down labor, permits, and site prep. This helps homeowners budget more accurately.
What type of shell is best for an in-ground installation?
Acrylic shells backed by fiberglass are the industry standard for permanent in-ground installations. They are durable, maintain water temperature efficiently, and have integrated jet systems. While some consider concrete or gunite for a fully custom shape, these require expert waterproofing and are generally more expensive and complex to repair than a pre-formed acrylic shell.
What is included in an in-ground hot tub kit, and is it a good option?
An in-ground hot tub kit typically includes the acrylic shell, the equipment pack (pump, heater, controls), and often the jet plumbing. It is designed to be “buried” or surrounded by a built structure. A kit can be a great option to ensure component compatibility, but it does not include the significant excavation, concrete, electrical, or finishing work, which are the most labor-intensive and costly parts of the project. Considering the essential hot tub accessories installation requirements early on helps ensure the kit fits the site and complies with codes. These requirements typically cover electrical supply, drainage, and access for service, influencing where and how the components are installed.
What are some popular design ideas for integrating an in-ground hot tub?
Popular designs focus on seamless integration. This includes surrounding it with a composite or stone deck to create a flush lounge area, building it into a multi-level patio, or incorporating it with natural rock waterfalls and landscaping. The key is choosing materials that complement your home’s exterior and allow for proper drainage and safe, easy access.
How do I find a reputable contractor for “in-ground hot tub installation near me”?
Start by searching for licensed pool and spa builders, as they have relevant excavation and plumbing experience. Always verify their license, insurance, and ask for references specifically for in-ground spa projects. Look at online reviews and portfolios. A reputable contractor will handle or coordinate the critical electrical, plumbing, and structural work, ensuring the entire system is built to code and functions as one unit.
The 7-Day Soak Check
Before you celebrate and slip into that first, well-earned soak, there’s a final protocol. Don’t just leap in. Power up the system and let it run for a full cycle. Listen for the confident hum of the jets and feel for strong, even pressure from every outlet. This is your moment to confirm every connection is secure and every valve is open.
Test the water, too. Use your test strips or liquid kit to verify the sanitizer level and pH are perfectly in the safe zone. Your eyes and nose are good detectors-the water should have no sharp chemical odor and should sparkle under the lights. This final systems check is the barrier between a construction project and a safe, relaxing retreat.
Your Golden Rule for Long-Term Bliss
From my years of opening up pumps clogged with gunk, one habit stands above all others for preserving your investment and your peace of mind. It’s simple, fast, and non-negotiable.
Rinse your filter cartridge with a strong hose stream every single week, and you’ll prevent a vast majority of flow errors, heater failures, and cloudy water battles before they ever start. Think of it as a two-minute insurance policy. That layer of sunscreen and body oils it captures weekly is the same stuff that turns into a concrete-like paste on your heater tube if left alone.
Time to Enjoy the Fruits of Your Labor
You’ve navigated the permits, the digging, the plumbing, and the chemistry. The hard part is genuinely over. Now, it’s time for the main event. Go turn on the bubbles, sink into that perfectly balanced water, and let the jets work out the last bit of tension from all that installing. You built this. Now go soak in it. Cheers.
Further Reading & Sources
- The Ultimate Guide to In-ground Hot Tubs | O-Care.com
- Should you install an in-ground hot tub? 5 tips | Backyard Planning
- In-Ground Hot Tub Installation | Cost of In-Ground Hot Tubs | Modernize
- r/hottub on Reddit: Installing a Hot Tub Semi inground?
- Essential Tips for Spa Installation and Hot Tub Installation
- In-Ground Hot Tubs: Everything You Need to Know – Bullfrog Spas
Charlie is a hot tub enthusiast with a passion for keeping your jets running smooth and your bubbles bursting with joy. With years of experience in hot tub and jacuzzi maintenance, Charlie knows that a happy tub means a happy you. Whether it’s dealing with stubborn filters or giving your spa a little TLC, Charlie’s here to share expert tips, tricks, and plenty of laughs to help you keep your bubbly retreat in tip-top shape. So, kick back, relax, and let Charlie handle the rest — because no one likes a cranky jacuzzi!
Outdoor Setup