How to Fix Your Hot Tub’s Dangerous Safety Gaps in 3 Simple Steps
If you’re wiping out on a wet deck or scrambling for a flashlight when the jets quit, your relaxation zone has a serious security problem. After decades of fixing pumps and balancing water chemistry, I’ve seen the same root cause for most backyard accidents: a complete absence of basic, life-preserving safety equipment. This isn’t a minor oversight; it’s a hazardous condition that risks slips, electrical issues, and injuries that are utterly preventable.
What You Need:
- A coarse, drainage-style non-slip mat.
- A GFCI outlet tester with a clear “trip” button.
- A waterproof flashlight or motion-sensor light.
- Less than 15 minutes of your time.
Follow this guide and you’ll build a safe, compliant hot tub environment yourself, saving the cost and wait for a professional.
Why Skimping on Safety Gear is a Risk You Can’t Take
Look, I get it. After the upfront cost of the tub itself, the idea of spending more on gear you hope to never use feels like a nuisance. I’ve been in garages where the life ring was still in its plastic wrap, buried behind pool noodles. Treating safety equipment as an optional accessory is the single biggest oversight I see in otherwise well-maintained backyards. That mindset changes the moment you need it and it’s not there.
The Real Cost of Hot Tub Accidents
Forget the tub for a second. Think about people. A slip on wet decking can mean a broken wrist or a concussion. An unseen drain cover issue can lead to a terrifying entrapment. The financial sting is real-sky-high medical bills, potential liability, and skyrocketing insurance premiums-but the human cost is permanent. Comparing the price of a $50 rescue pole to a $5,000 ER visit makes the choice brutally clear. I’ve balanced water chemistry for years to protect equipment, but balancing safety gear protects everything that matters more.
Common Hazards Every Owner Should Know
Visibility is low, surfaces are slick, and warm water can lull you into a false sense of security. Here’s what’s lurking:
- Slips & Falls: Wet feet on composite decking or ceramic tile is a recipe for a hard fall. The steam rising can also make surrounding surfaces damp and hazardous.
- Hair & Body Entrapment: A faulty or missing drain cover can create dangerous suction, especially for long hair. It’s a rare but severe risk.
- Chemical Exposure: Storing chlorine or acid within reach means a splash to the eyes or a child’s curious hands can cause serious burns.
- Electrical Shock: A faulty ground fault circuit interrupter (GFCI) or a cord running near the water can turn your relaxation zone into a hazard.
- Overheating & Drowning: The cozy heat can cause blood pressure drops and lightheadedness, increasing the risk of submersion, especially when combined with alcohol.
Knowing these hazards isn’t about fear; it’s about building a practical defense with the right tools at hand.
Essential Rescue Equipment for Drowning Prevention
Drowning is silent and fast. In a hot tub’s churning, bubbly water, it can happen in seconds without a splash. Your primary goal is to provide a way to help without entering the water yourself, keeping you safe to effectively assist. Every second you spend scrambling for gear is a second lost. Creating a safe hot tub environment—secure covers, clear rules, and vigilant supervision—helps prevent drowning. Proactive safety measures ensure you can respond quickly if needed.
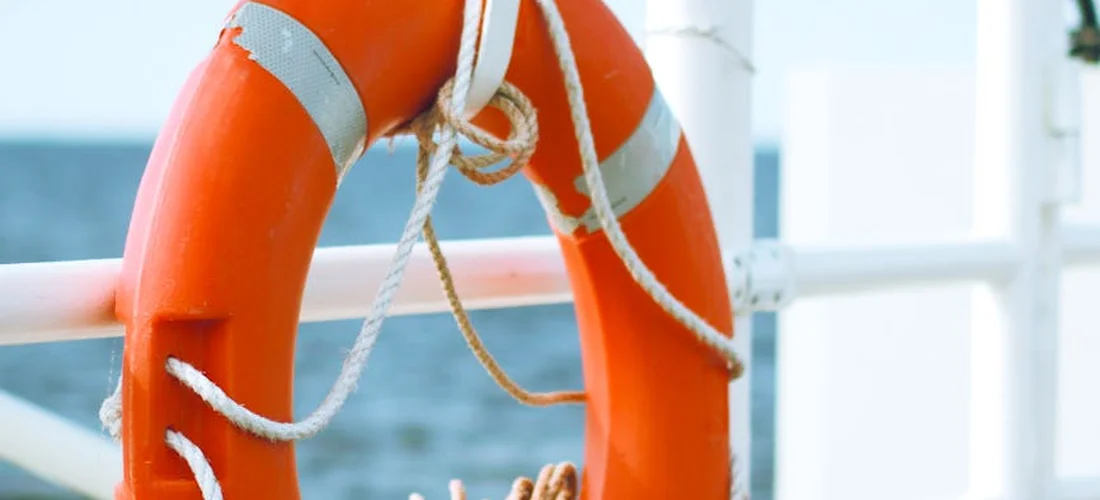
Life Rings and Rescue Throw Bags
A US Coast Guard-approved life ring with 40 feet of attached line is a classic for a reason. It’s buoyant, easy to throw, and gives a person something substantial to hold onto. The throw bag is its more compact cousin-a bag filled with floating line that you hurl accurately. Practice tossing your throw bag on dry land a few times a year; a tangled line or poor aim when you’re panicking renders it useless. I keep one mounted on a post just 10 feet from my tub, not stored neatly in a shed.
Reaching Poles and Pool Hooks
Also called a shepherd’s hook, this is your go-to for someone close to the edge. A sturdy, telescoping pole that extends to at least 12 feet lets you reach across the tub. Look for one with a blunt hook that won’t cause injury. In my toolbox, a reaching pole is as fundamental as a screwdriver-it’s the first tool you grab for a water-based emergency. For hot tubs, ensure the hook is small enough to effectively grasp an arm or leg in the confined space. It pairs well with other essential accessories for hot tub maintenance.
Rescue Ropes and Their Proper Use
A dedicated rescue rope, preferably bright orange polypropylene that floats, should be coiled and ready on a hook or in a container. It’s not just any old rope. Tie a series of large, secure knots every few feet along the rope; a panicking person can hold onto a knot far easier than a slippery, straight line. The free end should always be secured to something solid on the deck. I’ve drilled a simple eye-bolt into a sturdy post just for this purpose, ensuring the rope is always anchored and ready.
Anti-Slip Solutions to Stop Falls Before They Happen
The joyful splash of water often means a perpetually wet deck. That inviting shimmer is a hidden hazard, turning your patio into a potential skating rink. Preventing a fall is far easier and less painful than treating one, and it starts with creating a surface that grips even when soaked.
Non-Slip Mats and Deck Coatings
Think of your hot tub surround as a high-traffic shower floor-it needs texture. I’ve seen too many smooth, beautiful pavers become accident reports waiting to happen after a drizzle, especially when you put a hot tub on pavers. Your first line of defense is a physical barrier with grit.
For mats, you need more than a decorative outdoor rug. Look for products specifically labeled for “wet environments” or “poolside.” They should have a sturdy, open-weave rubber backing that allows water to drain through, preventing puddles on top. A good mat lies completely flat without curling edges, a major tripping hazard you can spot and fix immediately.
- Material Matters: Choose 100% polypropylene or rubber. Avoid cheap foam that disintegrates or vinyl that gets slick.
- Size it Right: Cover the entire “drip zone”-the area where people consistently step out soaking wet. A 3′ x 5′ mat is often too small; go bigger.
- Deck Coatings are Permanent Grip: For wood or concrete decks, a textured coating is a game-changer. I used a two-part epoxy with silicone carbide grit on my own treated-wood deck. It feels like fine sandpaper underfoot, even with a layer of morning dew. Application is a weekend project: clean, etch, roll on.
Safety Rails and Grab Bars: Installation Tips
A sturdy handhold provides stability and confidence, especially for older users or anyone getting in after a long soak. I always tell clients, “Install the rail before you think you need it.”
Choosing the Right Safety Rail
Not all rails are created for the unique stresses of a hot tub. That flimsy towel bar from the hardware store won’t cut it.
- Material: Solid stainless steel (Grade 316 is best for salt/chlorine resistance) or anodized aluminum. Plastic coatings can peel.
- Mounting: Look for models designed for “through-deck” or “flange” mounting. Through-deck is strongest, as the mounting hardware secures directly to the joist beneath.
- Weight Rating: It should support at least 300 pounds of dynamic force (the force of someone pulling or leaning). Check the manufacturer’s specs.
Step-by-Step Rail Installation
I’ve installed dozens of these. Taking your time here is critical for safety.
- Locate the Framing: Use a stud finder on a wood deck or a hammer drill to probe concrete. You must hit solid wood (joist) or use concrete anchors. Mounting just into decking boards is dangerously weak.
- Dry Fit First: Position the rail where it feels most natural-typically vertical, just outside the step area. Have someone simulate using it.
- Drill Pilot Holes: Use a drill bit slightly smaller than your mounting bolts. For wood, pre-drill to prevent splitting. For concrete, use a masonry bit and a hammer drill.
- Secure with Corrosion-Proof Hardware: Use stainless steel lag bolts for wood or stainless wedge anchors for concrete. Tighten firmly with a wrench, but don’t overtighten and strip the material.
- Test It Relentlessly: Put all your weight on it at different angles. It should not wiggle, creak, or bend. If it does, re-evaluate your mounting points.
A correctly installed safety rail should feel like an immovable part of your home’s structure, giving users instant trust.
Anti-Slip Footwear for Wet Surfaces
Bare feet are natural, but they’re also slippery. A dedicated pair of spa shoes bridges the gap between the tub and the house. I keep a milk crate with a few cheap pairs near my back door for guests.
- Look for Water-Specific Soles: The best have razor-cut or grooved patterns (like a boat shoe) made from a compound that stays grippy on wet tile and concrete. Crocs or similar clog-style shoes with plenty of drainage holes work surprisingly well.
- Avoid Traditional Flip-Flops: Their flat, smooth soles offer almost no traction on wet surfaces and can lead to a dangerous backward slide.
- Keep Them Clean: Rinse spa shoes weekly to prevent a buildup of slick algae or body oils that transfer from the deck.
Must-Have Medical and Emergency Response Kits
The relaxing properties of hot water and jets can sometimes mask medical issues like lightheadedness or lower blood pressure. Having the right tools within arm’s reach turns a panicked moment into a managed situation. Your kit isn’t for storing in the garage; it’s for keeping under a nearby bench or in a waterproof deck box.
Comprehensive First Aid Kit Contents
A standard store-bought kit is a start, but you need to augment it for wet, outdoor scenarios. Waterproof storage is non-negotiable-a ziplock bag inside the kit is a good start.
- Waterproof Adhesive Bandages: Standard fabric bandages fall off instantly on damp skin. Look for waterproof tape and gauze or bandages made for aquatic sports.
- Sterile Saline Solution: For rinsing eyes or wounds with clean water, far better than using hot tub water.
- Chemical Burn Gel: A specific hydrogel for acid or alkali burns is smart if you handle pH decreaser (acid) or chlorine granules.
- Instant Cold Packs: For bumps or sprains from a slip.
- Tweezers and Small Scissors: With blunt tips, stored in a small plastic case to prevent rust.
CPR Mask and AED Accessibility
This is the most critical level of preparedness. The heat and hydration changes in a hot tub can, in rare cases, stress the cardiovascular system, potentially leading to emergency situations.
A CPR face shield or pocket mask with a one-way valve provides a barrier for rescue breaths and is compact enough to hang on a hook near the tub. Practice deploying it quickly. For families with a history of heart concerns, consider an Automated External Defibrillator (AED). Modern units talk you through every step with clear voice instructions. Check local regulations, but many are now designed for home use. Mount it in a visible, accessible location on the path back to the house.
Waterproof Phone and Emergency Contacts
A phone is your lifeline. A regular phone in a plastic bag is a risky, clumsy solution.
- Use a Dedicated Waterproof Case: Invest in a hardened, sealed case rated for submersion. Test it monthly.
- Keep a Low-Tech Backup: A cheap, prepaid waterproof phone stored in the emergency kit with a charged battery is brilliant insurance.
- Post Clear Contact Info: Inside the kit’s lid, laminate a card with:
- Home address (for disoriented guests or babysitters).
- Nearest cross street.
- Poison Control number.
- Non-emergency line for the local police/fire.
In an emergency, seconds count, and fumbling for a phone or an address wastes precious time you don’t have. Make the information idiot-proof.
Chemical Safety Gear for Handling Spills and Burns
Dealing with hot tub chemicals demands respect—I learned that after a small muriatic acid splash left a burning sensation on my arm. Proper gear turns a potential emergency into a manageable cleanup task, protecting your skin and eyes from harsh reactions.
pH and Chlorine Test Kits for Daily Checks
Think of your test kit as a daily health check for your water, much like checking the oil in your car. I’ve balanced water in everything from soft rain-filled tubs to hard well water nightmares. Daily testing with a reliable kit stops minor imbalances from becoming major skin or equipment issues.
You have a few good options here, each with pros and cons:
- Liquid drop kits, like the Taylor K-2006, are my go-to for accuracy; they measure free chlorine, pH, and alkalinity with precision.
- Test strips are fast and cheap, but their colors can be tricky to read in low light, leading to guesswork.
- Digital testers remove the guesswork, but their probes need regular calibration with fresh reagent solutions.
From fixing cloudy water for clients, I know that ideal ranges are non-negotiable. Keep your pH between 7.4 and 7.6 and your free chlorine at 3-5 parts per million (ppm) for water that’s sanitized but gentle on the senses.
Chemical Spill Kit: What’s Inside and How to Use It
A dedicated spill kit isn’t overkill-it’s smart preparedness. I assemble mine in a bright orange bucket stored right next to the chemical locker. Your spill kit must be immediately accessible to contain and neutralize accidents before they damage decking or cause inhalation hazards.
Here’s exactly what to pack inside your kit:
- Chemical absorbent pads or spill socks, which soak up liquids far better than rags or paper towels.
- Neutralizers: baking soda for acid spills (like pH decreaser) and citric acid for base spills (like granular chlorine).
- A dedicated plastic scoop and dustpan to collect dry chemicals without using contaminated tools.
- Heavy-duty, sealable disposal bags for contaminated materials, marked clearly for hazardous waste.
If you spill dry chlorine, never add water. First, suit up with gloves and goggles, then carefully scoop the granules into your disposal bag to prevent dangerous chlorine gas from forming.
Protective Gear: Gloves, Goggles, and Aprons
This gear is your personal barrier against chemicals that can burn skin or damage eyesight. I use thick nitrile gloves and full-seal goggles every single time I open a chemical container. Ordinary dishwashing gloves or sunglasses offer zero protection against chemical splashes and fumes.
- Gloves: Choose chemical-resistant nitrile or rubber gloves that extend past your wrists; avoid latex.
- Goggles: ANSI-approved splash goggles that form a seal around your eyes are mandatory for handling liquids.
- Aprons: A simple polyethylene apron shields your clothes from drips and spills that can bleach or degrade fabric.
I ruined a good pair of jeans before I wised up. An apron costs less than a replacement pair of pants and adds a critical layer of safety between you and accidental spills.
Visibility Aids and Communication Tools for Night Use
The peaceful hum of the pump at night is soothing, but darkness hides slip hazards and makes emergencies scarier. Planning for night use isn’t just about mood lighting; it’s about creating a safe environment where everyone can be seen and heard.
Waterproof Lights and Flashlights
Built-in hot tub lights can fail, leaving you in the dark-literally. I keep a waterproof, floating LED flashlight in a clip by the steps. A high-lumen LED flashlight, rated IPX7 or higher, provides a brilliant, energy-efficient beam that cuts through steam and darkness.
For permanent solutions, consider these options:
- Low-voltage LED path lights installed along the walkway to the tub, preventing stumbles.
- Submersible, battery-operated puck lights that can stick to the hot tub shell or nearby surfaces.
- Solar-powered stake lights that charge by day and automatically illuminate at night.
From many late-night filter changes, I know shadows are tricky. Position your primary light source to shine directly on the steps and handrails, the most common spots for slips.
Whistles and Alarm Systems for Alerting Help
When you’re in water, your voice might not carry to the house. A whistle’s sharp pierce is universally understood as a distress call. Attach a waterproof whistle to a brightly colored lanyard and secure it to a post or handrail within easy reach from the water.
For more robust alerts, you can set up simple systems:
- Wireless personal alarms with a pull-pin that activates a 130-decibel siren.
- Waterproof wireless doorbells-press the button by the tub to sound a chime inside the home.
- Outdoor-rated baby monitors that allow two-way voice communication from the tub area to the house.
I helped an elderly neighbor install a doorbell system after she felt uneasy soaking alone. Test your alert device every season to ensure the batteries are strong and the signal is clear.
Emergency Phone or Intercom Setup
Slipping on a wet deck is bad; slipping and having no way to call for help is worse. A communication plan is crucial. A waterproof cell phone case or a fixed intercom station means you can summon assistance without having to move and risk further injury.
- Use a heavy-duty, submersible phone case or bag that allows full touchscreen operation.
- Install a weatherproof intercom with a call button that rings a base station inside your home.
- For a low-cost DIY option, use a wireless doorbell with multiple receivers placed in bedrooms and living areas.
During a power outage last winter, my waterproof flashlight and phone were the only things working. Keep your emergency phone or intercom in a consistent, obvious spot, like a mounted waterproof box, so anyone can find it in a panic.
Installing and Maintaining Your Safety Equipment
Getting the right gear is only half the battle; the real magic happens when you install it correctly and stick to a maintenance plan. From my years on the job, I can tell you that a safety item neglected is often an accident waiting to happen, and that goes double for anything near water and electricity. Let’s walk through how to set everything up for lasting protection and peace of mind.
Step-by-Step Guide to Safety Cover Installation
A flimsy or poorly fitted cover is worse than no cover at all-it gives a false sense of security. Whether you have a locking hardcover or a buoyant safety cover, the installation principles are similar. I learned this the hard way early in my career after seeing a wind-flipped cover scratch a shell and drain a tub, a costly mistake that started with rushed installation.
- Unpack and Inspect: Lay all components on a flat surface. Check for shipping damage to the vinyl, foam cores, and any metal hinges or locks. Even a small tear can let in debris and compromise insulation.
- Align with Precision: With a helper, position the cover over the tub, ensuring it’s centered. The overlap should be even on all sides. For locking covers, align the mechanism with the tub’s lip or receptacle before you fasten anything down.
- Secure the Anchors: If your cover uses straps, buckles, or a lockdown system, follow the manufacturer’s torque specifications. Overtightening can warp the frame, while under-tightening invites theft and wind damage. Use the right tools, not just guesswork.
- Test the Seal and Lock: Close the cover and listen for a solid, consistent seal around the perimeter. Engage the lock several times to ensure it clicks into place smoothly. A good seal keeps heat in, chemicals stable, and children out.
Regular Maintenance Schedule for All Gear
Safety equipment wears down from sun, chemicals, and weather. A simple calendar reminder can prevent most failures. Think of this schedule like balancing your water chemistry-skip it, and things get cloudy and dangerous fast. Here’s a breakdown I’ve refined from maintaining hundreds of spas.
- Weekly: Wipe down non-slip mats and the deck around the tub with a mild, non-foaming cleaner. Visually inspect handrails and steps for loose bolts or cracks. Give your safety cover a quick rinse to prevent chemical buildup on the vinyl.
- Monthly: Test the operation of your cover locks and straps. Lubricate hinges and moving parts with a silicone-based lubricant, not petroleum jelly, which degrades plastic. Check any GFCI outlets with their test button.
- Seasonally (Every 3-4 Months): Deep clean the cover with a proper vinyl protectant. Examine the cover’s core for waterlogging by feeling for heavy, sagging spots-a soaked cover loses its insulating value and becomes a hazard. Inspect the integrity of any attached safety ropes or alarms.
- Annually: Perform a torque check on all handrail and step anchor points. Consider having a professional inspect the cover’s structural integrity and the GFCI circuitry if you’re not comfortable testing it yourself.
Safety Checks Before Each Soak
This two-minute ritual is your final defense. It blends mechanical awareness with water chemistry savvy. I never get in a tub without doing this quick scan, and neither should you-it’s saved me from unexpected cold soaks and potential chemical burns.
- Confirm the safety cover is fully removed and securely stowed, not leaning precariously against the tub.
- Sniff the air above the water. A strong chemical odor often means unbalanced sanitizer; don’t enter until you test. That sharp “chlorine” sting usually means chloramines, not proper sanitizer levels.
- Look at the water clarity. You should see the bottom drain clearly. Cloudiness can hide hazards and indicates poor filtration or chemistry.
- Listen for the steady hum of the circulation pump. Silence or unusual grinding means a system fault. Place your hand near a water jet to verify heat is being produced.
- Feel the texture of the handrails and steps for any slickness or instability. A quick wipe with a towel can prevent a slip.
- Verify your chemical test kit or digital reader is within arm’s reach, so you can always confirm sanitizer and pH levels are safe before soaking.
Common Questions
What is an ASTM F1346 safety cover, and why is it important?
An ASTM F1346 certified cover is a specific type of safety cover tested to withstand a certain amount of weight, helping prevent accidental submersion. This standard is your assurance the cover is engineered as a passive barrier, not just a thermal lid. It’s crucial for households with children or pets, as a compliant cover significantly reduces the risk of unsupervised access to the water.
Are there specific safety rules for hot tub temperature and soak time?
Yes, for health and safety, it’s recommended to keep your hot tub water temperature at or below 104°F (40°C). Soak times should generally be limited to 15-30 minutes to avoid overheating, which can lead to dizziness, nausea, or fainting. Always exit the tub immediately if you feel lightheaded, and these limits are especially important for older adults, pregnant women, and those with health conditions. Always follow general health and safety guidelines for hot tub use.
Why should I post safety signs near my hot tub?
Safety signs serve as constant, clear reminders of important rules for all users, especially guests who may be unfamiliar with your tub’s specific hazards. They can warn against diving, highlight maximum occupancy, remind users not to soak alone or under the influence, and indicate the location of emergency shut-offs. Well-placed signage is a simple, effective layer of communication that promotes a culture of safety and respect for hot tub etiquette.
What’s the difference between a standard cover and a safety cover with a lock?
A standard insulating cover is primarily for retaining heat and keeping out debris, while a safety cover is a rigid, solid barrier designed to support weight and prevent accidental falls into the water. A true safety cover will include a locking mechanism (often a key or combination lock) that physically secures the cover to the hot tub shell, providing a critical layer of security against unauthorized access by children. If you’re curious about how much weight a hot tub cover can actually hold, our safety guide on load limits covers that question. This helps you choose and use the right cover for safety.
Where is the best place to install a safety handrail?
The most effective place for a safety handrail is at the main entry/exit point of the hot tub, typically where the steps are located. It should be installed vertically on a solid, structural part of the deck or tub surround, not just into the decking boards. For maximum benefit, consider installing a second rail on the opposite side of the steps to provide support for both entering and exiting the water safely. This complements proper steps to enhance your safety.
The Final Pre-Soak Scan
Before you slide into that warm, bubbling water, take 60 seconds for a final safety scan. Look at the water’s cool blue clarity. Listen for the steady hum of the circulation pump doing its job. Test the handrail to ensure it’s solid. This isn’t paranoia-it’s good practice. Treating this quick check as a non-negotiable ritual is what separates a reactive owner from a proactive one.
My one golden rule for keeping your safety zone intact? Make a firm habit of rinsing your filter cartridge with the hose every single week and giving it a proper deep-clean once a month; this single act prevents most flow issues, keeps your sanitizer working efficiently, and protects your pump from straining.
You’ve done the work. You’ve gathered the gear. The water is perfect. Now go earn that soak.
Further Reading & Sources
- Hot Tub Safety 101 Protect Your Home Guests and Peace of Mind
- The must-know rules of hot tub safety
- r/hottub on Reddit: What safety precautions should be taken when using a hot tub, especially with children or elderly individuals?
- What You Can Do to Stay Healthy in Hot Tubs | Healthy Swimming | CDC
- Hot Tub Safety Guidelines for Families with Children and Pets
- Hot Tubs & Safety – Strong Spas
Charlie is a hot tub enthusiast with a passion for keeping your jets running smooth and your bubbles bursting with joy. With years of experience in hot tub and jacuzzi maintenance, Charlie knows that a happy tub means a happy you. Whether it’s dealing with stubborn filters or giving your spa a little TLC, Charlie’s here to share expert tips, tricks, and plenty of laughs to help you keep your bubbly retreat in tip-top shape. So, kick back, relax, and let Charlie handle the rest — because no one likes a cranky jacuzzi!
Safety Tips